Wednesday, October 31, 2012

8 Spooky Nights - Black and Orange

Halloween is finally here, and that means the end of the 8 Spooky Nights challenge!!

I have to give a very big thank you to Kelly at Peace Love Lacquer for putting the challenge together! It's been an amazing 8 nights!


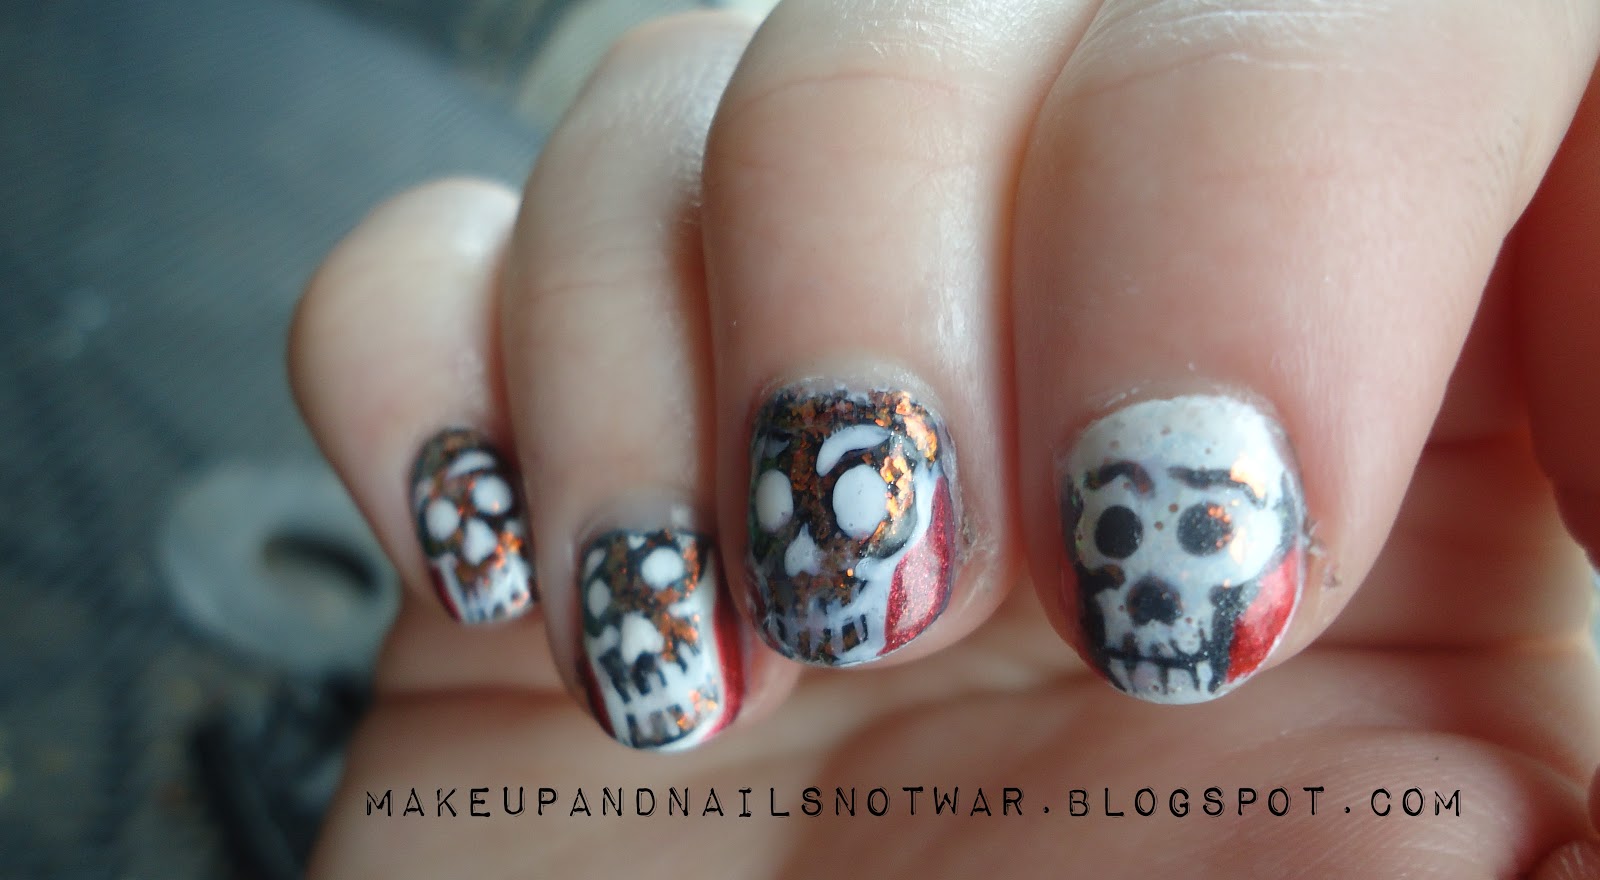
Something that I loved about this challenge is that is didn't require any specific techniques, only different themes. That being said, water marbling is one of the few things I've been scared to try! I always thought I wouldn't get a good outcome(which is a common problem I've seen!) and that it would be extremely messy! However, for black and orange, I decided to try out water marbling!


Here we go!! It's a tad messy and I already have tip wear since I need to go buy a new quick dry top coat (I've used literally an entire bottle in the past 2 months!!) I am SO happy with how these turned out though! I used a couple different oranges, including a really light one. It shows up as yellow-ish here, but on my nails it's a nice sherbet orange! I used a black shimmer that spread a lot, so my nails also have a touch of grey to them.

I am now OBSESSED with water marbling! I did my left hand with red/black/plum, but the top coat bubbled too much and you can't see the design that well. Since I'm not working tonight or going to a party I think I'll spend Halloween water marbling and watching some scary movies!

Go check out all the other great blogs!

Tuesday, October 30, 2012

8 Spooky Nights - Graveyards

Hey everyone! Today is Night 7 of the 8 Spooky Nights challenge and the theme was Graveyards!

I had originally planned to do a silhouette, but I started and these are what turned out! My original color was also a royal blue, but that got almost completely covered up.


I used my Korean dupe of Chanel's peridot for most of the designs, to give a "mossy" look! The pointer finger is it mixed with black, while the middle finger is layered over blue. The thumb has a base of gray, with the green and green mixed with black stippled on top with a brush. The ring finger is a cross of gold studs on a black base flecked with blue(which is completely invisible outside of the bottle) and I topped everything off with my Matte Real topcoat from Etude House.
I used different crosses as my inspiration, thinking of the tops of tombstones in old cemeteries. I really love the green/gold color and am glad I found a design it matches so well with!
Tomorrow is ONLY black and orange!! I have an interesting manicure planned out, so hopefully I can get it done :) (Even with the paper I forgot I needed to do for tomorrow!)

Go check out all the other great blogs!

Monday, October 29, 2012

8 Spooky Nights - Spiders

Only two more nights left in this challenge! Today's theme was "spiders". I had planned to try a thread spider web mani I saw, but I ran out of time. School, work, and everything else has been crazy these past couple of weeks! 

I'm not crazy about this design. I wasn't being careful, so the spider webs are super thick. And I think doing the three glitter pieces on the big spider was a mistake, I should've stuck with just one. At least the little fangs turned out cute!


Sorry for the tip wear + weird edges around the cuticles. My quick dry top coat is almost gone and I don't think I got these covered very well. I didn't clean up my cuticles and they flaked off a bit after my shower so I got all these weird jagged edges. :/ 


Here are all the challenges! I'm thinking about attempting a water marble for the the only Black and Orange, but since I've never done it no promises!

Here are all the other great blogs participating!

Sunday, October 28, 2012

8 Spooky Nights - Night 5 - Witches

8 Spooky Nights - Witches

I'm quite late posting these, but they were finished Friday! I went out of town to visit family and didn't have the time to put them up until now.

The theme for night 5 was "witches". Since I did a super spooky design for ghosts, I decided to something a little bit more fun: HARRY POTTER!

Growing up with Harry Potter, it's not surprising it was near the top of the list when I thought about "witches". Since I was doing my non dominant hand I stuck with a very simple design to represent the four houses:


Hope you enjoy, and I should have the rest of the posts up on time!

Go check out everyone else's great designs!

Thursday, October 25, 2012

8 Spooky Night - Night 4 - Ghosts

It's the halfway point! I've been loving this challenge so far, but my nails today take the cake!!!!

Today's theme is "Ghosts". While brainstorming this, I couldn't come up with anything original, so I started thinking of a broader topic.

Which led me to - how do ghosts become ghosts? They die, and the Grim Reaper is the Western personification of death!

So here we have my Grim Reaper/Ghost nails! I am IN LOVE with these nails! Another design that just flowed straight from my mind to the nail!!


On the thumb I have a grim reaper face, then a "recycled" red rhinestone cross on the pinky, and a bloody scythe across the other three nails! To re-do the cross, I just painted any area without a rhinestone with a dark gray super sparkly shimmer polish. 


Check out all the other awesome bloggers participating! 


Wednesday, October 24, 2012

8 Spooky Nights: Night 3 - Candy


On to "night" 3 of the challenge! I now understand why these are challenges, it took me FOUR tries to get something I was even a little bit happy with. I have something planned for "Ghosts" tomorrow night so hopefully that works out!

Also, word of advice: sugar manis are difficult. And slightly messy. And need FOREVER to dry unless you want them randomly peeling/smudging off. And sugar looks just weird and melted if you put a top coat on it. I tried one for this and it was just AWFUL. I asked a friend for his opinion and the only thing he could say was "well, it's not your best work." Then I tried doing a pumpkin basket thing, which looked weird. Then I tried layering glitter but I went too quickly and it just smudged everywhere.


Yeah....not too thrilled with these. I started off with a bright purple base, layered 365 Days of Colors "Funfetti" (which I love!) on top, then added more glitter with a Korean dupe from Face Shop of DL's "Happy Birthday". Then I free handed the candy pattern on it and used a matte top coat.

As underwhelming as I think these are, all the other awesome bloggers in this challenge have put up some AMAZING manicures! Go check them out!!


Tuesday, October 23, 2012

8 Spooky Nights: Night 2 - Vampires

Hey everyone! Time for "Night 2" of the 8 Spooky Nights challenge!

I have to admit I was OBSESSED with vampires as a kid/teenager. (Note: This was before Twilight. I'm such a hipster, I know.) Some of my obsession was because I have great great great x a bunch grandparents from Romania. I also had these super pointy incisors(and had to have my baby teeth pulled). They looked like fangs, especially with the permanent teeth growing in on top.

Now, sadly, my teeth have been rounded by my orthodontist during my imprisonment in braces but I can still enjoy some awesome vampire nail art!


We have two sets of vampire mouths (with different lip colors!), two vampire bites, and a red rhinestone cross. 


And some awesome props to take photos with! On top is my Wet n Wild Fantasy Makers "Tombstone" polish in Black Magic. (The one with copper sparkles). Bottom we have my Revlon "Just Bitten" lip stain in Flame. I love love both of these products, but especially the lip stain! I also have the Just Bitten lip stain balm, which is also great. They're perfect for throwing on quickly and the color lasts SO LONG. I've also heard it's great for layering underneath lipstick to create new colors! 

Tomorrows challenge is CANDY! (Even though I want to leave my vampires on longer...that's the only bad thing about challenges!)


There are also a lot of other amazing bloggers participating, please check them out!

Monday, October 22, 2012

8 Spooky Nights: Night 1 - Skulls

Hey everyone! I'm participating in my first blogger challenge - 8 Spooky Nights hosted by PeaceLoveLacquer!

The first challenge is Skulls! I, like many nail bloggers, immediately thought of sugar skulls. Once I started though, I quickly got derailed and ended up with these beauties!

They look much better in person - Essie's Shine of the Times was used on all the skulls but barely shows up in the photos on white.


Here's a peek at what to expect until Halloween! I've already got tomorrows design done(the only downside is not getting to enjoy my nails longer!) Thankfully we're skipping Saturday and Sunday since I'm going to visit my brother (and niece who is the CUTEST thing ever!) If I have time I'll give some bonus nails or maybe a makeup look!


There are also a lot of other amazing bloggers participating, please check them out!


The final bit I promised is your chance to get involved! Peace Love Lacquer is hosting a non-blogger contest!

If you dont have a blog, you can join in too! Non-bloggers can submit in a contest and win a prize at the end! Im not going to say what it is... it will be a surprise for now. But I will tell you it is an aaaaaammmmmmaaaaazzzzzziiiiiiiinnnnnnnggggg Indie Halloween polish. Need I say more?

Here are the rules:
 

  • You must be a non-blogger to compete for the contest prize.
  • All nail art must be on your nails. No falsies. Only new work please.
  • Stamping is allowed. No stickers or nail decals. Acrylic paint is allowed, but nail polish must be    used in some aspect of the design.
  • In order to compete for the Contest Prize, you must complete all 8 days and have them submitted via email topeacelovelacquer@gmail.com or on Peace Love Lacquer's Facebook wall before midnight Pacific time the day of the challenge.
  • Day 8 (Only Black & Orange) will be the nail art that is voted upon.
  • All qualifying participants Day 8 photo will be placed in a folder on November 1st and voting will be most likes. Voting will close at 6pm Pacific on Monday November 5th. The official winnder will be announced the morning of November 6th.
  • Must be 18 years old and live within the US or have a US address in order to qualify for prize.


Wednesday, October 17, 2012

Double Time Leopard Glitter Gradient Tutorial

Hey everyone! When I did my "Bloody Mummy Wrappings Tutorial" I went through the hassle of photographing each step then combining them. It's hard to take decent photos in my apartment, so it was way more trouble than I thought! For these nails, I decided to go with a graphic tutorial since the methods are pretty basic. Hit "Read More" to see the tutorial!

Tuesday, October 9, 2012

Circle Lens Makeup Look


Hey everyone! Something a little different from me today - a makeup look!!

This look utilizes a lot of the stuff I received for my birthday (found here). I'm also wearing my circle/colored contact lenses!

Hit "Read More" to see all the pictures!

Tuesday, October 2, 2012

Bloody Mummy Wrapping Nails Tutorial

Hello everyone! After doing my "mummy" halloween thumb, I decided I'd turn it into my first tutorial. I changed the process a little bit, since I had issues with the striping tape starting to come up. Hope you all enjoy, and send us photos, tag us on Tumblr, or leave a comment with a link if you try it out!

Hit "Read More" to see the tutorial!

Monday, October 1, 2012

Halloween Nails Part 1

Even though it's only the first day of October, I decided to do some Halloween nails!!

Out of all the holidays,  I definitely think Halloween offers the most variety in terms on what you can put on your nails! Today's mani was a more generalized look, just to play around.

On the thumb I have bloodstained mummy wrappings! This look was achieved by sponging tan and brown polish over black striping tape, then carefully adding a few sponged spots of blood. I'm thinking about adding a tutorial for this one - let me know if anyone is interested!

The index finger is a simple blood drip on a nude base. The darker red was achieved by mixing a red sheer/jelly polish with black. The middle is Frankenstein inspired, pretty simple. The ring finger is a spider web on top of mini holo glitter on white. The pinky is just black covered with gold glitter, I was thinking of a magic spell book or a wizard's robe.

All of these also have my glow-in-the-dark polish from Forever 21 over them! I was a little worried it would affect the colors, but other than small green glitter flecks, it's basically sheer. They don't glow very strongly(and you have to hold them by a light) but it's just so much fun knowing they can do that!